Windows Deployment Services can not be installed on Windows Server Core unfortunately - it still requires a Windows Server install with a GUI (Desktop Experience). Luckily we can still install it using PowerShell and the command line. In this post I’ll go through the initial steps on how to deploy and configure a WDS server using command line and PowerShell.
Installing Windows Server
Boot the server from the Windows Server media and on the “Select the Operating System you want to install” screen, select the option “Windows Server Standard” or “Datacenter” edition with “Desktop Experience” in brackets.
Please note: You can no longer add and remove the GUI (Desktop Experience) with Windows Server 2016 onwards as you could with Windows Server 2012/2012 R2. This is due to numerous problems with keeping the installation and removal process consistent with updates. With Windows Server 2016 and above the only way to add or remove the GUI is to re-install and select one of the server editions with the “Desktop Experience” option.
Initial Configuration
Once the install process has completed, you will be prompted to set the Administrator password.
- Set the local “Administrator” password.
- Log in to Windows as the Administrator user.
- Open an elevated command prompt by pressing “Win + X” and selecting “Command Prompt (Admin)” from the menu.
- Type
sconfigto get the Server Configuration menu. - You’ll need to configure at least the Network Settings - IP address, subnet mask, gateway, and DNS.
- You may want to enable Remote Desktop.
- Add the server to the domain - you’ll be asked if you’d like to change the computer name, and prompted to restart the server.
- After the restart, log in as a user with administrator privileges to the server.
Important note: Windows Server 2016 shipped with a bug that causes it to fail to get updates from WSUS out of the box. To work around it you should update directly from the internet or download and install the latest Cumulative Update for Windows Server 2016, which at the time of writing is KB4093120, download here.
Additional Storage Configuration
You may want to configure additional locally attached disks or iSCSI/MPIO storage. Creating new volumes that are locally attached can be done via the diskpart command line tool. Below are the commands to create a new, NTFS formatted volume, with the drive letter of E:\ and the name “Data”, from a second disk in the server using the diskpart tool. First, run diskpart from the command line, then use the following commands:
|
|
The MPIO feature must be installed before the tool is available. You can do this via PowerShell:
|
|
When MPIO is installed you can load the MPIO utility using mpiocpl. For the iSCSI utility you can use iscsicpl. iSCSI is installed as part of the base Windows Server feature set.
Install Windows Deployment Services (WDS)
If you’ve just logged on to the server, open an elevated command prompt as before, by pressing “Win + X” and selecting “Command Prompt (Admin)” from the menu. Type “PowerShell” into the command line window before running any of the commands below.
First we need to install the WDS feature:
|
|
Now we need to run some post install tasks. The following command will initialize the WDS server and use the E:\ drive to store it’s content.
|
|
WDS is now installed and the initial configuration is complete, but some further configuration is required via the WDS Microsoft Management Console (MMC).
- Log in to the server as a user with administrator privileges.
- Open the “Windows Deployment Services MMC” under “Windows Administrative Tools” in the Start Menu.
- Expand the “Servers” node and Right click on the
server-name.contoso.comand select “Properties”. - On the “PXE Response” tab select the “Respond to all client computers (known and unknown)” do not tick the “Require administrator approval option”.
- Click “Apply” and close the window.
Adding a PXE Boot Image from Microsoft Deployment Toolkit
To add a ‘LiteTouch’ boot image from MDT to WDS:
- Log in to the server as a user with administrator privileges.
- Open the “Windows Deployment Services MMC” under “Windows Administrative Tools” in the Start Menu.
- Navigate to “Servers” >
server-name.contoso.com> “Boot Images”. - Right click in the empty window, and select “Add Boot Image”.
- Navigate to the “Boot” folder in the deployment share of MDT and select
LiteTouchPE_x64.wim. - Complete the wizard.
To test the new boot image, create a new VM in Hyper-V with the following configuration:
- Generation 1
- 2x vCPUs
- 4GB of RAM
- Legacy Network Adapter with access the local network.
- Virtual Hard Drive of at least 80GB.
- Boot from the legacy Network Adapter.
- If using Hyper-V on Windows 10 1709 and above, make sure “Use Automatic Checkpoints” is disabled.
Start the Virtual Machine and you should be prompted to press F12 to boot and the deployment environment should start just as if you were booting from the LiteTouchPE_x64.iso. If the VM is not booting from the network, it could be that the VM is on a different VLAN. To enable PXE booting on different VLANs you’ll need to add the IP address of the WDS server as a IP helper address on each VLAN on the routing switch.
Configuration for BIOS and UEFI Clients
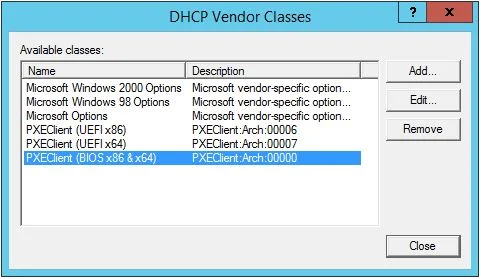
If you have a mixture of devices with both BIOS and UEFI firmware that you wish to PXE boot, some additional configuration may be required depending on the network and versions of DHCP and WDS. On a network with a Windows Server 2016 DHCP server, WDS server and Cisco switches with a helper address configured, I haven’t needed to do this configuration but I wanted to include it for completeness. Your mileage may vary. Most of the following information is from a very helpful video from BranchCache Bob - here’s the video. It is assumed that you have a Microsoft Windows Server running DHCP. The first thing to do is to define the vendor classes for both the BIOS PXE Client and the UEFI PXE Client.
- Go to “DHCP”, right-click on “IPv4”
- In the “DHCP Vendor Classes” window, click Add
- For the “Name” enter “PXEClient (UEFI x86)”
- For the “Description” enter whatever you want
- Under the “ASCII” text enter
PXEClient:Arch:00006- Important Note: you will not be able to paste this text, and it’s also case-sensitive - Click OK to add it to the list
- Now repeat steps 2 - 6 for “PXEClient (UEFI x64)” with
PXEClient:Arch:00007as the ASCII value. - Finally, repeat steps 2 - 6 for “PXEClient (BIOS x86 & x64)” with
PXEClient:Arch:00000(five zero’s) as the ASCII value.
or using PowerShell:
|
|
You should now have three additional vendor classes.
Now we need to create policies in DHCP so that the correct files are served to the correct clients. You will need to do this for each DHCP scope.
- Go to “DHCP” and expand the scope you wish to create a policy for
- Right-click on “Policies” and choose “New Policy”
- Enter “PXEClient (UEFI x64)” for the name
- Enter a “Description”, or leave it blank. Click Next
- On the “Configure Conditions for the policy” screen, click Add
- In the “Add/Edit Condition” window, click the “Value:” drop down menu
- Choose the “PXEClient (UEFI x64)” vendor class you created earlier
- Tick the “Append wildcard” check box and then click Add and finally OK
- Click Next on the “Configure Conditions for the policy” screen
- On the “Configure settings for the policy” screen, click No for the “Do you want to configure an IP address range for the policy”. Click Next
- “Please Note:” if DHCP is on the same server as WDS, you will need to set option 060, if WDS is on a different server, you do not need to set option 060
- On the “Configure settings for the policy” screen, scroll down until you see options “060” (if applicable), “066” and “067”
- Tick option “060” and enter “PXEClient” if applicable
- Tick option “066” and enter either the FQDN or the IP address of the WDS server.
- Tick option “067” and enter
boot\x64\wdsmgfw.efi- this is the x64 UEFI boot file for WDS. Click Next. - On the “Summary” screen, if all the details are correct, click Finish
- Now repeat steps 2 - 14 for “PXEClient (UEFI x86)” with
boot\x86\wdsmgfw.efias option “067” - Finally, repeat steps 2 - 14 once again for “PXEClient (BIOS x86 & x64)” with
boot\x64\wdsnbp.comas option “067” and leave option “060” empty
or using PowerShell:
|
|
The -ScopeId should be the IP range of the DHCP scope you want to add the policy to.
Don’t forget to repeat the above for each DHCP scope you wish to PXE boot from. In DHCP if you expand the “Scope Options” folder you should see the new options you just created and under “Policy Name” should be the names of the policies you just created.
You should now be able to boot both a UEFI and BIOS devices from the network. Please note, if DHCP is installed on the same server as WDS, you will need to check both the “Do not listen on DHCP ports” and “Configure DHCP options to indicate that this is also a PXE server” options.
Support My Work
If you would like to support me, please check out the link below.
If you have any questions or comments, please leave them below.
Thanks
-Mike