Update 2018-04-20
I’ve rolled the information in this post, and updated it, into a new post about setting up a WSUS server from scratch on Windows Server 2016 Core. The post is also suitable for a regular Windows Server 2016 server with a GUI. You can read it here.
Update
I’ve tested and updated this post for Windows Server 2016.
In this post, I’m going to walk through setting up a WSUS server from scratch on Windows Server 2012 R2 or Windows Server 2016. I will not be covering WSUS with System Center Configuration Manager, just a standalone WSUS installation.
Here’s the specification of the Virtual Machine I’m using for this walk through:
- Hyper-V, Generation 2, V8.0 VM
- 4GB non-dynamic RAM
- Dynamically expanding 100GB VHDx for C:\ drive
- Dynamically expanding 100GB VHDx for E:\ drive
- Windows Server 2012 R2 Standard/Windows Server 2016 Standard
Preparation
First we’ll download the prerequisites. To view reports from WSUS, you’ll need the following:
- For Windows Server 2012 R2: Microsoft Report Viewer Redistributable 2008 - requires .NET 2.0 which is a feature installed through the Server Manager.
- For Windows Server 2016/Windows 10: Microsoft Report Viewer 2012 Runtime redistributable
- Microsoft System CLR Types for Microsoft SQL Server 2012 - required for Microsoft Report Viewer 2012. This is a bit trickier to find, so here’s a direct link: x64 version, x86 version.
In case the links to Microsoft System CLR Types fail in future, here is the main download page link. This page links to components from the Microsoft SQL Server 2012 Feature Pack, you have to go to the Install Instructions section and download the specific component you need. If you want to run the SUSDB in a local SQL Express instance rather than the built in Windows Internal Database, then you’ll need to download the following:
SQL Express & SQL Server Management Studio Installation
Running the SQL Express setup will give you the option of Basic, Custom, or Download Media. Click Basic and go through the installation wizard as you normally would. On my demo machine, I ran the custom install and installed SQL Express on a separate drive, where I will also put the WSUS content. So I have E:\Microsoft SQL Server and E:\Microsoft SQL Server x86 folders. When the installation is completed, restart, then run the SQL Server Management Studio install executable that you downloaded earlier and run through the install, once again restart the server when prompted.
WSUS Installation
Go to Server Manager > Manage > Add Roles and Features > Role-based or feature-based installation > Select a server from the server pool > select Windows Server Update Services > accept the defaults in the Add Features dialogue box > click Next on the Features section > click Next on the WSUS info screen.
Role Services
Select WID if you intend to use the Windows Internal Database. Select Database if you intend to use a local SQL Express installation or have an full SQL Server install.
Content
I recommend storing the WSUS content on a separate disk. For me I use E:\wsus_content.
DB Instance
If using a SQL Server or SQL Express instance, select the server and the instance name here. For SQL Express you will need to enter “Machine name\sqlexpress” and click Check connection. Click through and accept the defaults of the Web Server Role (IIS) > Role Services > Confirmation. Check the Restart the destination server automatically if required box, click Yes to the dialogue box, then click Install and go make a drink.
Post Install
After installation, go to Server Manager and click the flag and run the Post-Installation tasks.
When they complete go to Administrative Tools and open the Windows Server Update Services MMC. You should see a Before You Begin wizard. Click Next > Join the Microsoft Update Improvement Program if you wish > Choose Upstream server, as this is the first WSUS server you’ll choose Synchronize from Microsoft Update > Specify the Proxy Server settings if needed > Start Connecting, and then wait, this may take a while!
When WSUS has connected, select the applicable languages for your environment, select the applicable Products - I select all products as we’ll only be downloading updates that we actually need. Select the Classifications, I select all, EXCEPT drivers, you do not want drivers through WSUS - they increase the size of the database immensely, better to manage drivers through another method. Configure the Sync Schedule - I leave this on manual until the server is setup. Check the Begin initial synchronization box, then Finish.
Configuration
When your server has performed the initial synchronization, you can finish off the configuration.
Synchronization Schedule
You’ll want to set up an automatic sync schedule, here’s where you can do it, I usually have two sync’s per day.
Automatic Approvals
There’s a rule already here to automatically approve Critical and Security updates meaning that they will be downloaded and distributed via WSUS automatically without any admin interaction. I recommended enabling this, but don’t run the rule. I add an additional rule for definition updates for Exchange, Office, Forefront Endpoint Protection, and Windows Defender. I recommended adding in the definition updates for any products that are relevant to you. Once again, don’t run the rule.
Computers
This is something that tripped me up in the early days a lot. Clients wouldn’t appear in WSUS, even after I’d set the correct settings in Group Policy. The solution here is to set the option here to “Use Group Policy or registry settings on computers” and to create the groups in WSUS under Computers, that you’ve configured in your GPO’s for Windows Update.
Group Policy
To enable your clients to get updates from WSUS, you’ll need to configure the group policy for them. You’ll find the settings in group policy Computer Configuration > Policies > Administrative Templates > Windows Components > Windows Update. The key settings here are Specify intranet Microsoft update service location and Enable client-side targeting. For Specify intranet Microsoft update service location you’ll need to enter http://machine name:8530 in both text boxes. For Enable client-side targeting you’ll need to enter the name of the group and it must match the name of the computer group you created in WSUS.
Managing Updates
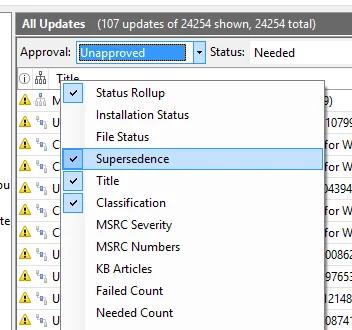
After a while your clients should have contacted the WSUS server and be in the correct group and have reported the updates they require. Now you need to approve the updates required for your environment. On the overview of your WSUS server click on Updates needed by computers and on the new screen change the drop down menu Approval: to Unapproved and wait for the list to refresh. Now, right-click on the Title bar and enable the Supersedence column and click on the very tiny column to sort the updates by Supersedence. Now approve the “top” critical, security and any other updates you want to be installed on your clients.
Take care not to approve any updates, service packs or feature packs that you do not want to be pushed out via WSUS. For example if you do not require .NET installed on your clients, then don’t approve it. All you’re doing is potentially increasing the attack surface of that device and also the amount of updates that it has to download and install in future. Scroll right to the bottom and once again approve the updates you want to be installed. All the other updates can be ignored for now. The updates you just approved should be all your clients require to be up to date. Once the clients download, install, and then report back to the WSUS server, you will have a better idea of what is required.
Maintenance and Troubleshooting
Keeping WSUS running well over time is a matter of keeping the IIS application running happily and the database clean. I currently run a PowerShell script every week that cleans up the database, declines and deletes old updates and I’ve had to increase the memory available to the WSUS Application Pool to 6GB.
Here’s the PowerShell script I’ve scheduled to run every Friday via Task Scheduler.
|
|
The script is pretty simple. First we get the WSUS server information, the Machine name should be changed to the name of the WSUS server. The script then deletes obsolete updates from the database and the downloaded files, deletes obsolete, expired, and superseded updates from the database. You can do this all manually using the Server Cleanup Wizard, but you really need to run it regularly, and running it from PowerShell is quicker and automated. As a reminder, to run PowerShell scripts from Task Scheduler you need to run the following action:
|
|
You may get an error when trying to connect to the WSUS server one day that says “Error: Unexpected Error” and appears as Event ID 7053 in the Event Viewer.
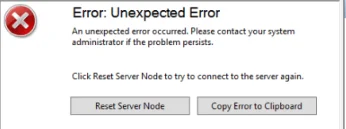
Here are the two solutions that have always fixed that for me: Increase the memory allocated to the WSUS application pool in IIS. The server in question had the WSUS DB installed in WID and 8GB of RAM available, I increased the pool to 6000000 KB (6 GB) which is probably overkill, but it solved the issue on that system. Try running this WSUSUtil command. WSUSUtil is located in %systemdrive%\Program Files\Update Services\Tools.
|
|
In this instance the server only had 4 GB of RAM and was running the WSUS DB in SQL Express. That’s it! You should have a fully functioning WSUS server, that will stay in good health over time. Be sure to check up on your updates at least once a week and don’t forget to test them out on a small group of clients and servers before installing them on your entire estate.
If you have any questions or comments, please leave them below.
-Mike