Update 2018-04-28: I’ve completely re-written and updated this post with new information for Windows Server 2016 here.
When installing PXE (pronounced “pixie”) booting for use with Microsoft Deployment Toolkit there are a few things to consider. There’s not much to installing WDS and configure PXE booting for MDT on a flat network, but if you have a larger network with VLANs there is some additional configuration needed. I’ll be covering the flat network configuration here and will post about the additional configuration needed for a larger network at a later date.
The demo network for this post is a Active Directory Domain Controller (DC01), a WSUS server (WSUS01) and a MDT server (WDS01), which is where we’re installing Windows Deployment Services, and finally a Hyper-V VM (PC01) configured like so:
- Generation 1
- 2x vCPU
- 4GB RAM
- Legacy Network Adaptor - set as first boot device
Installing and Configuring Windows Deployment Services
To install WDS on Windows Server 2016/2012 R2:
- Open Server Manager.
- Go to the Manage menu.
- Select Add Roles and Features.
- Select Role-based or feature-based installation.
- Select the server in Server selection.
- Tick Windows Deployment Services and both Deployment Server and Transport Server in Server Roles.
- Click through Features.
- Confirm your choices.
- Complete the installation.
To configure the installation:
- Open the Windows Deployment Services MMC in Administrative Tools.
- Right-click WDS01.contoso.com.
- Select Configure to start the configuration wizard.
The first page of the wizard states a DHCP server is required. On my demo network I’m currently using a basic DHCP server built into a NAS appliance. It’s lacking in many configuration options that a full Windows DHCP server would provide, but for this flat network, it will do the job just fine. So, let’s configure WDS:
- Select Integrated with Active Directory.
- Set the Remote Installation Folder Location onto the
E:\drive which also has the MDT Deployment Share. - For the PXE Server Initial Settings select Respond to all client computers (known and unknown) do not tick the Require administrator approval option.
- After a short install phase, the Operation Complete screen will appear. Uncheck the Add images to the server now tick box.
To test that PXE is working, boot the VM PC01 and it should get an IP from the DHCP server, prompt for F12 to be pressed and when F12 is pressed, display an error that looks like this:
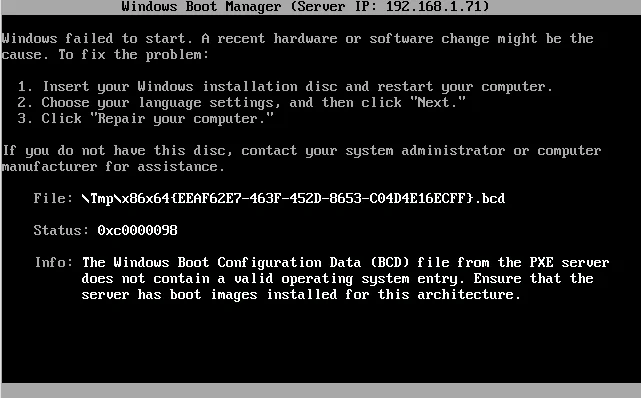
This error is normal. The PXE boot process has worked but there are no boot images for it to load.
Booting from the LiteTouch MDT image
To add the LiteTouch boot image from MDT to WDS:
- Open Windows Deployment Services MMC.
- Expand Servers >
wds01.yourdomain> Boot Images. - Right click in the empty window, and select Add Boot Image.
- Browse to
E:\DeploymentShare\Boot\LiteTouchPE_x64.wimand click through to complete the wizard.
To test that this has worked, go back to the VM PC01 and boot it via PXE again and it should now load the Windows PE deployment environment. That’s it! We’ve created a basic PXE server for booting into MDT. When dealing with a multi VLAN network, there are a few more things to consider which I’ll cover in a future post.
If you have any questions or comments, please leave them below.
-Mike