Before You Start
In my previous MDT guides I’ve always assumed that the users doing the imaging are also admins of the MDT server, or even domain admins. In this brief guide I’ll outline the permissions needed for a regular, non-admin user to deploy a computer using MDT.
First we’ll need to create a group for the users who will be doing deployments. We’ll call the group “MDT-Users”.
Setting the Share Permissions
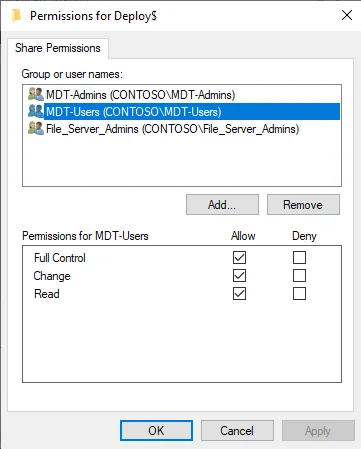
We’ll now add the group to the ACL for the MDT Deployment share permissions. The group will need full access but we’ll lock down the permissions on the files and folders ACL.
- Right-click on the Deployment share folder and select “Properties”
- Click on the “Sharing” tab
- Click on “Advanced Sharing”
- Tick the box “Share this folder”
- Click on the “Permissions” button
- Click on the “Add” button and type in “MDT-Users” and click on “OK”
- Check the “Allow” tick box for “Full Control” in the Permissions list
- Click OK on all the permissions windows that are open for the changes to be made.
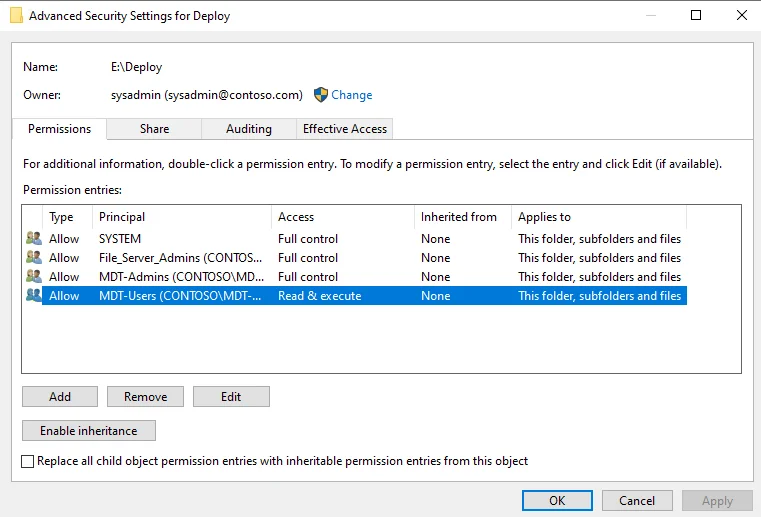
Setting the File Permissions
Next we’ll set the following permissions in the root of the Deployment share folder.
- Right-click on the Deployment share folder and select “Properties”
- Click on the “Security” tab
- Click on the “Advanced” button
- Add “MDT-Users” and ensure that the group only has “Read & execute” permissions.
- Click OK on all the permissions windows that are open for the changes to be made.
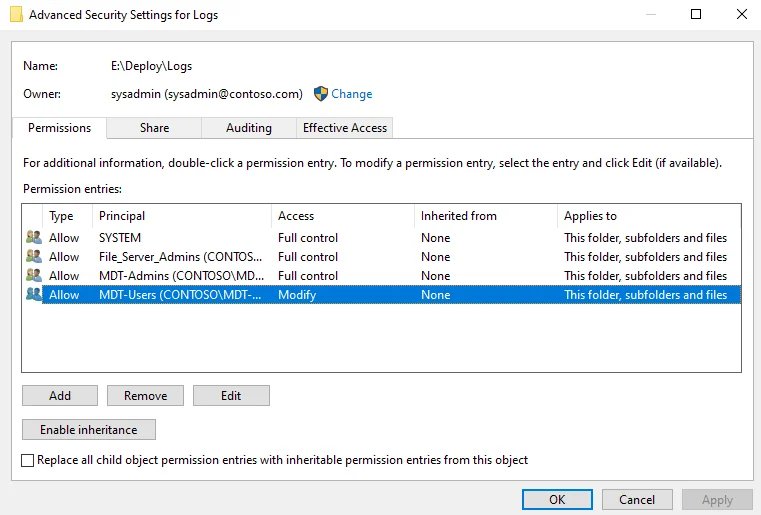
Setting File Permissions for Deployment Logs
If you have logs configured, you’ll need to set the following permissions on the “Logs” folder.
- Right-click on the Logs folder and select “Properties”
- Click on the “Security” tab
- Click on the “Advanced” button
- Click on “Disable inheritance” and then click on “Convert inherited permissions into explicit permissions on the object”
- Add or ensure that “MDT-Users” has “Modify” permissions.
- Click OK on all the permissions windows that are open for the changes to be made.
Setting Permissions for Domain Join
To add the deployed computer to Active Directory, a user account with the appropriate permissions can be configured in the CustomSettings.ini.
Here is an example.
|
|
To give the “mdt_admin” user the required permissions, I’d recommended creating a group also called “MDT-Admins” and then giving that group the following permissions in Active Directory.
- In Active Directory Users and Computers, click on the “View” Menu and then click on the “Advanced Features” option.
- Now go to the OU where the PC accounts are created and right-click on the OU and select “Properties”.
- In the new windows, click on the “Security” tab, then the “Advanced” button and then click the “Add” button.
- Next click on the “Select a principal” text and type the “MDT-Admins” group and then click OK.
- In the “Permissions:” section check “Create Computer Object” and “Delete Computer Object” and then click on OK.
- Once again, click on the “Add” button and then on the “Select a principal” text and type the “MDT-Admins” group and then click OK.
- Now click on the “Applies to” menu and change it to “Descendant Computer Objects”.
- In the “Permissions:” section check the following:
- Read All Properties
- Write All Properties
- Read Permissions
- Modify Permissions
- Change Password
- Reset Password
- Validate Write to DNS hostname
- Validate Write to Service Principal Name
- Finally, click OK on all the permissions windows that are open for the changes to be made.
With these permissions any member of the “MDT-Admins” group will be able to join a computer to Active Directory and create a computer account in the OU that these permissions are made to.
Support My Work
If you would like to support me, please check out the link below.
If you have any questions or comments, please leave them below.
-Mike